A look at business, law and life from a technophile.
Helpdesk
Fix: Google WiFi – We are having trouble registering your WiFi Point
2 Fix:
Fix:
For the primary:
Power up the WiFi puck with the network cable plugged in, but don’t go into the app. Look on the bottom for the network name and password (starts with “setup” for the network name). In your phone settings, add the setup network and use the password near the square QR code. Then go into the Google WiFi app and start the setup process for the primary puck.
For a secondary puck:
Plug in the puck (with no network cable) and add the setup network from the bottom label. I had to then reboot the puck (unplug and then replug power) and then go back to the Google WiFi app while the puck was rebooting, to allow the “search and find” part of the app to work. Otherwise, it would go directly to “activate mesh” and fail.
Analysis:
It looks like the app has a problem making the setup network stick. Once the phone has the setup network added, the setup process seemed to work.
Hopefully this helps you, as it took me 5 hours to come up with this solution. I was about ready to throw in the towel. However, note that once you get it setup, the system has been really nice to have.
Since I’ve completed the install, the Google WiFi mesh network has been working really well. I’ve played network games off of a mesh point, made Verizon Wi-Fi calling calls on an iPhone throughout the house (and off of each of the points). It has been pretty bullet proof. If only the installation had been easier.
Hope it helps
–Ben
Sources:
R Pearson from Google WiFi Help Support boards.
Replace Text With Equation (or other Clipboard Content) in Word
0Problem:
I had a big word document that had a bunch of text that needed to be turned into equations, fractions, etc. This often happens with pasting unformatted text.
Solution:
You can put in ^c into the replace box and it will pull whatever was last copied in the clipboard. This could be an equation, text or probably picture. That’s right, you just need to type carat (shift-6) followed by “c” into the box, which looks like: ^c
Source:
Thanks to gmayor at msofficeforums.
Hope that helps!
–Ben
Fix – OSXFuse with fuse-ext2 errors on OS X El Capitain
0EDIT – Do not download Xcode from the App Store – Way too Slow – Use Developer Download page
This has to be one of the more frustrating installs I’ve ever done. Note that I’m not even sure how some of these changes fix the issue. I’ve just tracked it down and beat my head against the wall until I succeeded.
However, let’s fix a few errors:
./autogen.sh fails –
FIX – Need to fix configure.ac (see https://github.com/mauser/fuse-ext2-fakeFS/pull/2/commits/8596cc3ed6acacbd077cdcce0bab38a30788495d )
Starting on line 9, add three lines to configure.ac, to make it look like this (lines to add are shown as “Add”:
(Note that the smiley face is actually a colon followed by a paren – I’ve beat my head against a wall on this one and don’t feel like looking up the wordpress fix). 🙂
| AC_PROG_CC | ||
| AC_PROG_INSTALL | ||
| Add | +m4_pattern_allow([AM_PROG_AR]) | |
| Add | +AM_PROG_AR | |
| AC_PROG_LIBTOOL | ||
| Add | +AM_PROG_CC_C_O | |
| AC_PATH_PROG(CHMOD, chmod, 🙂 | ||
| case $target_os in | ||
configure fails
FIX – add a package declaration to the line to make it look like:
PKG_CONFIG_PATH=”$(brew –prefix e2fsprogs)/lib/pkgconfig” CFLAGS=”-idirafter/$(brew –prefix e2fsprogs)/include -idirafter/usr/local/include/osxfuse” LDFLAGS=”-L$(brew –prefix e2fsprogs)/lib” ./configure
make fails
FIX – Download Xcode from the developer site (NOT THE APP STORE – SOOOOO SLOOOOWW!)
https://developer.apple.com/downloads/
Hopefully that helps you all install fuse-ext2 with OSXFuse. Good Luck.
–Ben
Resources:
https://github.com/alperakcan/fuse-ext2
https://github.com/mauser/fuse-ext2-fakeFS/pull/2/commits/8596cc3ed6acacbd077cdcce0bab38a30788495d
https://github.com/alperakcan/fuse-ext2/issues/33
Fix – MS Word has Different Headers on Pages and Linking Doesn’t Work
2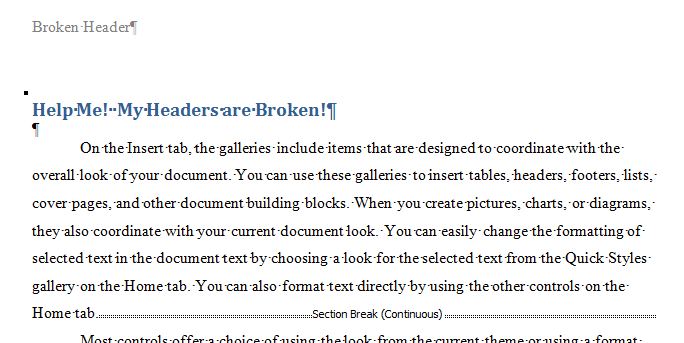
How to Fix Broken Headers
The Fix:
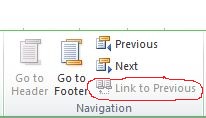 We need to link each header from each section back to the original header (or footer). After each section break we will need to insert a new page (Ctrl-Enter for shortcut). Once each section is on its own page, we can edit the header (or footer) for that section. Double click on the header to go into the edit header/footer mode. The design tab (of the ribbon) should have the focus and you should see a navigation pane with a “link to previous” option. Click it to link the current header to the previous header. Do this for each section that you have given its own page (Ugh!).
Once you fix the headers, you can test them by typing in a letter or number in one header and scrolling through the pages to make sure it shows up on all the pages.
Once you are satisfied that the headers (or footers) are fixed, you can delete each of the new page returns. (Use the paragraph symbol on the Home tab to show them, if you have difficulty).
The Problem:
I have a bunch of continuous section breaks in my document, each seems to have its own heading. As I edit the document, my headers disappear or change.
What is Happening:
This is due to the fact that each section can have its own header attached. So if I have a bunch of continuous sections on a page that I have copy/pasted from elsewhere with their own headers (not linked), then Word will select one of the section headers (I think the top one) and use it for the page header (and/or footer).
Hope this helps!
–Ben
Sources:
Trial and Error and a few choice words.
Fix – MS Excel – Cause PivotTable to Refresh When New Data is Entered
0The Fix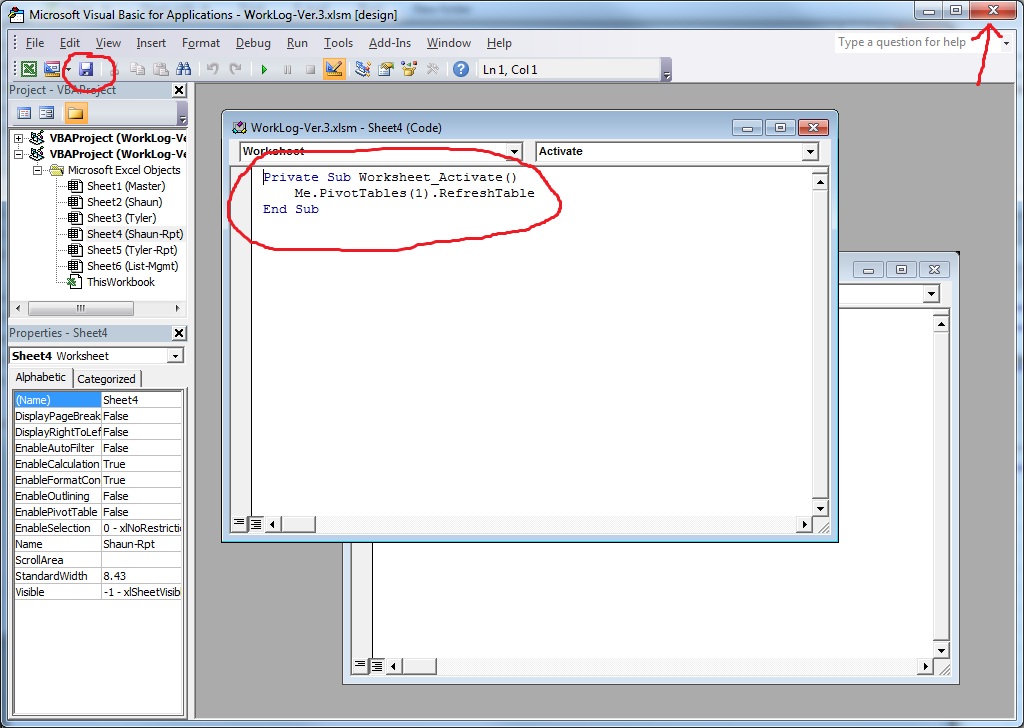
- Right Click on your pivot table report tab
- Select the view code menu item
- Add the code snippet below (assuming that the Pivot Table is the first or only pivot table on the page) in the box
- Click on the Save button at the left of the window
- Close the code window.
- Every time you click on the worksheet tab, the table will refresh.
Private Sub Worksheet_Activate()
 Me.PivotTables(1).RefreshTable
End Sub
The Problem
I was helping my brother in law work on a master spreadsheet that listed the various jobs that were being worked on. I created two pivot tables that filtered the jobs by the person who was working on it. However, when the master list was updated, the pivot tables were not refreshing. To work around it, he was exiting and then opening the file again. Yuck!
What is Happening
The bit of code is telling the first pivot table on the worksheet tab to update when the worksheet is accessed (i.e. activated).
Hope that helps!
–Ben
Sources

Fix – MS Word – Remove Next Page Section Breaks – Get Rid of the Blank Page
47
UPDATE 4/10/2015: Note that you need to make sure that all of your pages are the same size. On one copy/paste, I noticed that the copied pages were A4, while my normal pages were letter size. Until all my pages were letter, I could not remove the next page section break.
UPDATE 10/10/2014: See update for a potential better way to fix stubborn next page section breaks that won’t delete. Thanks CherryBerry!
Problem: Word has an extra page at the end that you can’t delete, and when you turn on the Show/Hide codes function a “Section Break (Next Page)” appears after your text. In fact, every time you delete the Next Page Section Break, text moves to the last page.
 Solution: Click after the section break (i.e. on the last page). Go to File -> Page Setup … in the menu (in XP – in Later Versions, go to page setup). Click on the layout tab in the pop-up window. Change the Section Start from “New Page” to “Continuous” using the drop down arrow. Hit the OK button. Phew! See the Graphic to the Right
What happened: I have no idea. But this allows you to change a section break’s behavior. It appears that Word is insistent on always moving back any Next Page Section breaks if deleted. However, if you change the behavior of the current break, its OK.
Hope that Helps.
–Ben
Sources: See Suzanne S. Barnhill’s comment on Wugnet
UPDATE 10/10/2014:
 CherryBerry made a great comment below that fixes some of the more persistent next page section breaks:
“At the bottom-right corner of the window next to the size slider, there should be 5 icons. Click on the one closest to the slider, when you mouse over it, there should be a label thing saying “Draft”, click on that icon. there should be text saying “::::::::::::::::::::::::Section Break (Next Page):::::::::::::::::::::::::::”. Delete them.”
I’ve included a picture to show the draft button at the bottom right of the window.
Thanks CherryBerry!
–Ben
Fix – Use Cross Reference to Reference a Sequence/List of Items in MS Word
10Problem – I had a list of claims in which I wanted a cross-reference to work in a cross reference window. The fields were there, highlighted as field codes, but the claims didn’t show up in the cross-reference window.
Fix – Right click on the field and click “toggle field codes.” Note the name after the “SEQ” or other three letter beginning. Go to Insert -> Reference -> Caption. Click on “New Label” button. Add the name as it was spelled after the SEQ. Click OK. Click Close. Now go to Insert -> Reference -> Cross Reference and your name is now in the drop down box. Select the name and you should see your sequence displayed in the main pane in the cross-reference box. Phew!
Hope that helps!
–Ben
Source: Comment on The Occasional Tech

Fix – Make All Track Changes be One Reviewer
9Problem:
You’re at work and you and several reviewers have made changes to a document using track changes. However, you don’t want to send the client a document showing internal editing, but just a coherent single author track changes document.
Solution:
You remove the author information in the privacy settings and all track changes show as one author. In word 2003, it is under the menu Tools -> Options -> Security Tab -> “Remove personal information from file properties on save” checkbox.
DANGER:
Changes are still tracked. So it looks like the editor corrected him/herself. You will need to accept deleted insertions.
Hope that helps.
–Ben

Fix – Adobe Acrobat Opening Multiple PDF Files Instead of One Problem
0 Problem: When my boss started up his computer and/or clicked on a PDF file, he would have multiple PDF windows open. It was almost like his computer was opening every PDF he had opened before.
Fix: Run disk cleanup in windows. I’m told that on a mac, you should remove (and backup) a file called com.adobe.acrobat.90.sh.plist from the preverences folder.
For the windows solution:
- Open the disk cleanup tool by going to Start -> All Programs -> Accessories -> System Tools -> Disk Cleanup
- Choose “Files from all users on this computer”
- Click Continue (if you have user access controls enabled – probably)
- Choose the C: drive and wait for it to finish
- Leave the default checked boxes (although you could try checking everything) – BE AWARE that this step will delete stuff. Make sure you didn’t want anything its going to delete.
- Click OK
- Click Delete Files (if you’re sure) and wait for it to finish.
- Try to open a PDF file.
What Happened: I’m not sure. However, I suspect there was a temporary file or command line argument that should have been deleted, but got left alone. Every time adobe acrobat (or adobe reader) started, it was fed that information and told to open those files. This is normally useful, as when you click on a file, that filename is provided to acrobat or reader. However, if the system doesn’t forget that filename, but instead adds to it – you can end up with multiple files opening. I don’t know where those temporary files reside. However, a disk cleanup seems to wipe them out.
Hope that helps,
–Ben
Disk Cleanup Page, Adobe Forum on a Similar Mac Problem, Techarena Forum (just note that deleting the recent file list didn’t fix it for me)

Fix-PCLaw Crash 9.10b-Windows Accounting Software for Lawyers has stopped working
17 PROBLEM: PCLaw crashes right after you type in your password to your books. In no way can you login. You get the error message that “Windows Accounting Software for Lawyers has stopped working.”
FIX: Uninstall Internet Explorer 9, which should roll you back to Internet Explorer 8. PCLaw cannot function with Internet Explorer 9 unless you have PCLaw v10 Service Pack 5 Hotfix 3. Here’s the steps:
- Go to the Control Panel
- Go to Programs and Features
- Click on Installed Updates (in the left pane)
- Look under the Heading “Microsoft Windows”
- Right click on Windows Internet Explorer 9
- Select Uninstall
- Click Yes
- Click Continue
- Restart Your Computer
Explanation: PCLaw most likely uses Internet Explorer for some things under the hood. Apparently IE 9 breaks compatibility with the functionality of older versions of IE. Luckily, it looks like those who run XP will not be hit by the problem, as IE 9 won’t run on XP.
Hope this helps,
–Ben
Sources: Lexis PCLaw, Affinity Consulting, Microsoft Windows Support, Computerworld